Quick Start: Custom Workflows
In this tutorial, you'll build a custom workflow with two prompts. By the end, you'll have an interactive playground to run and evaluate your chain of prompts.
The complete code for this tutorial is available here.
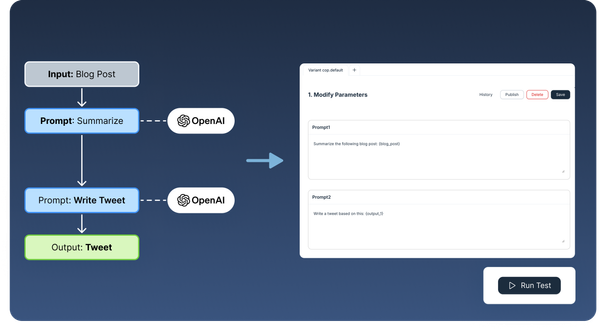
What you will build
A chain-of-prompts application that:
- Takes a blog post as input
- Summarizes it (first prompt)
- Writes a tweet from the summary (second prompt)
1. Create the application
We will build an app that summarizes a blog post and generates a tweet. The highlighted lines show Agenta integration.
from openai import OpenAI
from pydantic import BaseModel, Field
import agenta as ag
from agenta.sdk.types import PromptTemplate, Message, ModelConfig
from opentelemetry.instrumentation.openai import OpenAIInstrumentor

ag.init()
client = OpenAI()
OpenAIInstrumentor().instrument()


class Config(BaseModel):
    prompt1: PromptTemplate = Field(
        default=PromptTemplate(
            messages=[
                Message(role="system", content="You summarize blog posts concisely."),
                Message(role="user", content="Summarize this:\n\n{{blog_post}}")
            ],
            template_format="curly",
            input_keys=["blog_post"],
            llm_config=ModelConfig(model="gpt-4o-mini", temperature=0.7)
        )
    )
    prompt2: PromptTemplate = Field(
        default=PromptTemplate(
            messages=[
                Message(role="user", content="Write a tweet based on this:\n\n{{summary}}")
            ],
            template_format="curly",
            input_keys=["summary"],
            llm_config=ModelConfig(model="gpt-4o-mini", temperature=0.9)
        )
    )


@ag.route("/", config_schema=Config)
@ag.instrument()
async def generate(blog_post: str) -> str:
    config = ag.ConfigManager.get_from_route(schema=Config)

    # Step 1: Summarize
    formatted1 = config.prompt1.format(blog_post=blog_post)
    response1 = client.chat.completions.create(**formatted1.to_openai_kwargs())
    summary = response1.choices[0].message.content

    # Step 2: Write tweet
    formatted2 = config.prompt2.format(summary=summary)
    response2 = client.chat.completions.create(**formatted2.to_openai_kwargs())

    return response2.choices[0].message.content
Let's explore each section:
Initialization
import agenta as ag
ag.init()
Initialize Agenta using ag.init(). This sets up the connection to Agenta's backend.
Configuration with PromptTemplate
class Config(BaseModel):
    prompt1: PromptTemplate = Field(default=PromptTemplate(...))
PromptTemplate bundles everything needed for an LLM call: messages, model, temperature, and other settings. Agenta renders a rich editor for each PromptTemplate field in the playground.
Use {{variable}} syntax with template_format="curly". The input_keys list tells Agenta which variables to expect.
Entry point
@ag.route("/", config_schema=Config)
async def generate(blog_post: str) -> str:
The @ag.route decorator exposes your function to Agenta. The config_schema parameter tells Agenta what configuration to show in the playground.
Accessing configuration
config = ag.ConfigManager.get_from_route(schema=Config)
This retrieves the configuration from the current request. When you edit prompts in the playground, the new values arrive here.
Using PromptTemplate
formatted = config.prompt1.format(blog_post=blog_post)
response = client.chat.completions.create(**formatted.to_openai_kwargs())
format() substitutes variables and returns a new template. to_openai_kwargs() converts it to arguments for the OpenAI client.
The @ag.instrument() decorator must come after @ag.route().
2. Create the entry point
from dotenv import load_dotenv
load_dotenv()

import app  # noqa: F401 - registers routes

from agenta import app as application
This file loads environment variables and exports the FastAPI app for uvicorn.
3. Add dependencies
agenta
openai
python-dotenv
opentelemetry-instrumentation-openai
4. Set environment variables
OPENAI_API_KEY=sk-...
AGENTA_API_KEY=ag-...
AGENTA_HOST=https://cloud.agenta.ai
5. Run and connect
Start your server:
uvicorn main:application --host 0.0.0.0 --port 8000 --reload
Expose it with ngrok:
ngrok http 8000
Your server must be accessible from the internet for evaluations to work. Use ngrok or deploy to a public URL.
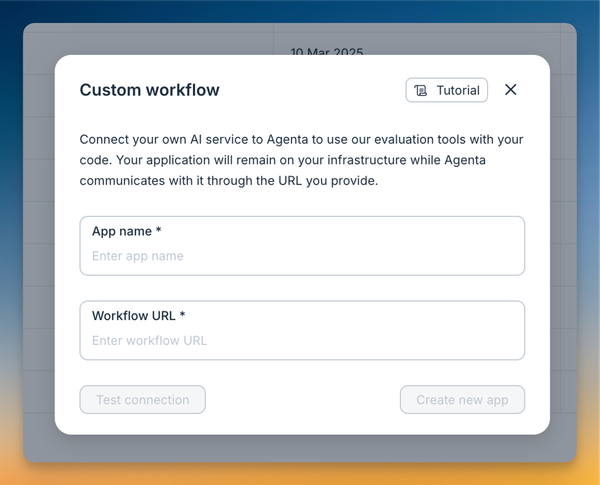
Copy the ngrok URL (e.g., https://abc123.ngrok.io). In the Agenta UI, click "Create Custom Workflow" and provide this URL.
Using the playground
Once connected, you can:
- Edit prompts in the UI
- Change model parameters
- Test with different inputs
- Save new variants
- Compare versions side by side
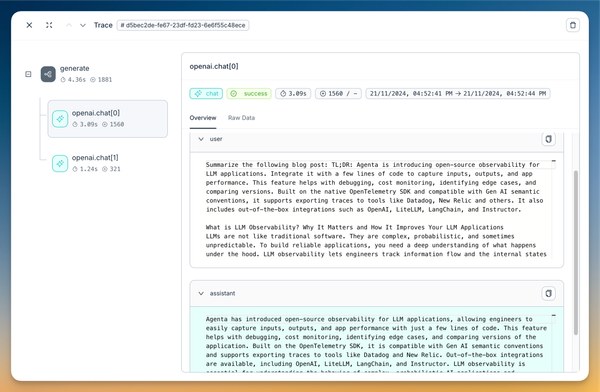
The traces panel shows each step of your workflow, including LLM calls and their inputs/outputs.
Next steps
- Integration: How Agenta integrates with your service in dev and prod
- Observability: Add detailed tracing to your workflow